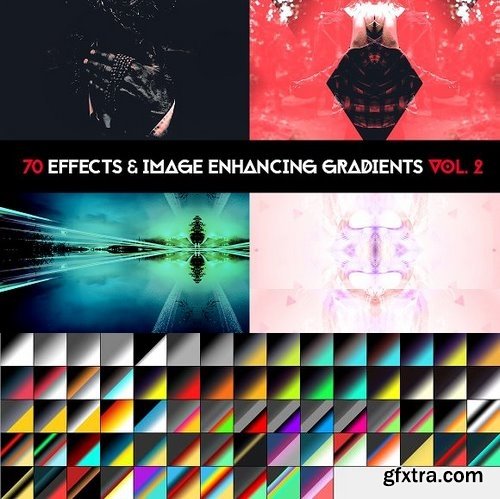
https://creativemarket.com/RobertBRK/70 Gradients for your daily use. These are really good for images, for enhancing them, adding effects, for adding them a bit of style. However, you can use them for other purposes as well, creativity knows no limits. The showcase image was enhanced with the help of these gradients. You can do a lot of things and styles, it depends on the way you are experimenting with them.28732-Effect-Image-Enhancing-gradients
https://creativemarket.com/RobertBRK/428732-Effect-Image-Enhancing-gradients

https://creativemarket.com/DesignSquad/91904659-Sunlight-Leak-Photo-Effect
Carry out mesmerizing, high-quality images and photography in a couple of clicks! This photo effect comprises Smart Object layers, providing complete customization, ease, and versatility of a working process. Simply open the required layer by double-clicking its thumbnail, delete the placeholder shot, add your graphics, save it and watch the design magic happening in your Photoshop artboard. Dont forget to toggle some adjustment features, adding the last touches to the composition.

CM - Foil Balloon Photoshop Effect 2498448
https://creativemarket.com/Medialoot/2498448-Foil-Balloon-Photoshop-Effect
Easily create a realistic balloon foil effect with this Photoshop template. Just replace the included Smart Object with your own design and change the color to any color that you wish. Any type of design is supported (vector shapes, raster or a simple font) and you can easily change the color by controling the HSL values.

- Open Photoshop (Minimal Supported Version: CS6)
- Go to the "Actions" panel (if you don't know here it is, go to Windows - Actions)
- On the top-right side of the panel there's a small icon with 4 horizontal lines - click on that
- Then select the option "Load Actions" and select the .atn file from the folder you have after buying this package.
- Open the image you want to add the effect on, select the action you want, and press play.
- First, don't use images that are incredibly dark or bright. Make sure your images have a normal amount of light and are not extremely dark. This way you can make sure your images will look good after adding the effect.
- Second, make sure you use this action on new-opened images. Using this action on projects that already have other images in them may result in adding the effect to all the images. The reason for this is that I use a technique that lets you change the parameters of the effects in case you want, and because of that the effect may be added to every image on your projects if you use the action in that way. To avoid that, open a new image in Photoshop, use the action, save the image and then use it in another project. !!!

- The Matte Effect Photography Collection includes 43 Lightroom presets.
- One-Click Lightroom Presets and filters
- A short tutorial on how to install presets in Lightroom.
- Before and after photos of every preset to better understand how each preset looks like on a final image
- FAQs: HOW TO TAKE FULL ADVANTAGE OF MY LIGHTROOM PRESETS – MY ANSWERS TO YOUR FREQUENTLY ASKED QUESTIONS.
- Matte Istanbul
- Matte Amsterdam
- Matte Faroe
- Matte Cornwall
- Matte Iceland
- Matte Norway
- Matte Gotland
- Matte Ireland
- Matte Zurich
- Matte England
- Dark Matte 0
- Dark Matte 1
- Dark Matte 2
- Simple Matte 0
- Simple Matte 1
- Simple Matte 2
- Simple Matte 3
- Simple Matte 4
- Matte Grain 0
- Matte Grain 1
- Matte Grain 2
- Matte Grain 3
- Matte Grain 4
- Adobe Lightroom 4, 5, 6 & CC.
- Lightroom presets are only compatible with Adobe Lightroom and will not work in Photoshop.
- Full customizable, simply apply the chosen preset and adjust settings to suit.
- Use with Windows PC and Mac.
- Compatible with RAW and JPEGs, though these Lightroom Presets were specifically created for RAW photos.

- Open Photoshop (Minimal Supported Version: CS6)
- Go to the "Actions" panel (if you don't know here it is, go to Windows - Actions)
- On the top-right side of the panel there's a small icon with 4 horizontal lines - click on that
- Then select the option "Load Actions" and select the .atn file from the folder you have after buying this package.
- Open the image you want to add the effect on, select the action you want, and press play.
- First, don't use images that are incredibly dark or bright. Make sure your images have a normal amount of light and are not extremely dark. This way you can make sure your images will look good after adding the effect.
- Second, make sure you use this action on new-opened images. Using this action on projects that already have other images in them may result in adding the effect to all the images. The reason for this is that I use a technique that lets you change the parameters of the effects in case you want, and because of that the effect may be added to every image on your projects if you use the action in that way. To avoid that, open a new image in Photoshop, use the action, save the image and then use it in another project. !!!


- Open Photoshop (Minimal Supported Version: CS6)
- Go to the "Actions" panel (if you don't know here it is, go to Windows - Actions)
- On the top-right side of the panel there's a small icon with 4 horizontal lines - click on that
- Then select the option "Load Actions" and select the .atn file from the folder you have after buying this package.
- Open the image you want to add the effect on, select the action you want, and press play.
- First, don't use images that are incredibly dark or bright. Make sure your images have a normal amount of light and are not extremely dark. This way you can make sure your images will look good after adding the effect.
- Second, make sure you use this action on new-opened images. Using this action on projects that already have other images in them may result in adding the effect to all the images. The reason for this is that I use a technique that lets you change the parameters of the effects in case you want, and because of that the effect may be added to every image on your projects if you use the action in that way. To avoid that, open a new image in Photoshop, use the action, save the image and then use it in another project. !!!
SermonBox - Seasonal Collection

SermonBox - The Series Pack Collection
Top Rated News


Would you like to be a Author?